Community gardening in the heart of downtown Minneapolis
In a Pickle?
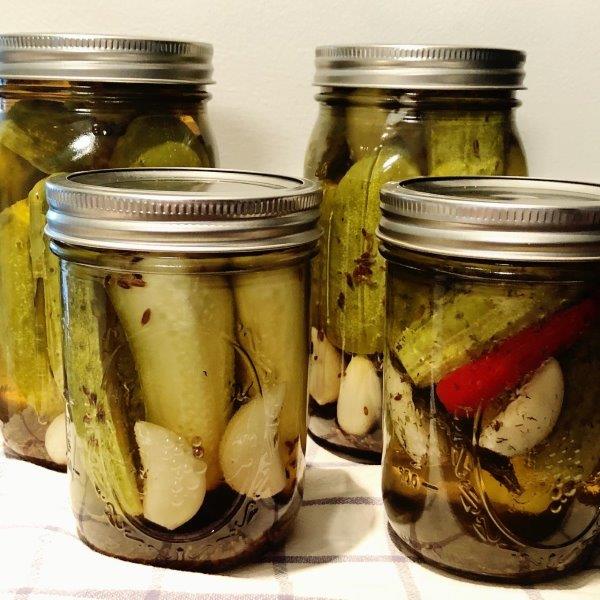

Have you ever been interested in trying to make pickles, but don’t know where to start? Trust me, you aren’t alone! But last year, two of our gardeners dove in head first, with zero experience, to learn all they could about the magic behind making a cucumber into a pickle!
Ben Etten and Kristin Fair both love pickles. Well, one loves pickles, and the other loves the idea of preserving food. In any case, they both arrived at the conclusion that they should make pickles.
Neither had ever done any canning or preserving of any kind, but thanks to COVID, both had a lot of time at home to do some research. They discovered that due to the high acidity of the vinegar in the brine, and the generally soft flesh of a cucumber, you don’t need a pressure cooker to make pickles. You really just need a pot big enough to hold submerge a mason jar in (with at least an inch of water covering).
Over the course of the growing season, they experimented… a lot. They tested out changes to the brine recipe, the size of the cucumbers, sliced versus whole, and even different additives to include in the jar. All in all, they ended up with over 30 quarts of pickles, all in one season! They ended with a wide variety of pickles – including classic dill, bread and butter, and even a habanero dill! – and a wealth of pickle making knowledge. Here are the key points they learned:
- Use smaller cucumbers, but don’t be afraid to slice a bigger one up into chunks if you need to! They still taste great!
- We found that having a really simple, base brine that you can use for almost anything was the best. If you want different flavors (like garlic, dill, or even spicy peppers) add whole ingredients to the jar along with the cucumbers. They taste great, and they look impressive!
- Pickle crisp (aka calcium chloride) really does help give your pickles a snap!
- If you have some brine left over, save it! Just dump it in a mason jar, store it in the fridge, and add it to whatever brine you are making the next time.
- Most important – don’t be scared! Our first time was terrifying, but the pickles still turned out. Just try it!
What do YOU do with produce from your Garden? We want to know! Submit your ideas HERE for recipes, and maybe yours will be included on the website!
Basic Brine
Use this basic brine as a base for whatever pickles you want to make (except bread and butter, very different brine) and control the flavor of the pickles by adding different ingredients directly to the jar with the cucumbers!
- 8 cups of water
- 1/3 cup granulated sugar
- 3 Tbsp pickling salt
- 6 cups distilled white vinegar
- Brine is simple – combine all ingredients in a pot and slowly bring to a boil.
- It’s important that the brine is boiling (or near boiling) when you add it to the packed jars (see pickle steps below)
Classic Dill – Jar Contents
Here are the ingredients Ben and Kristin added to each jar along with the cucumbers to make a classic dill pickle. These ingredients are per quart jar, and can just be added whole. If you want the jars to look really fancy, practice “trapping” fresh dill along the side of the jar as you are packing the cucumbers in!
- 1 bay leave
- 5 peppercorns
- 2 garlic cloves
- 3 heads (flowers) of dill
Pickle Directions
- Prep your cucumbers by washing them, and then trimming off the blossom end of the cucumber (which contains enzymes that can make the pickles soft).
- Sterilize both your mason jars and your lids in boiling water. These should be in the water at least 5 minutes after the boil starts.
- Mix up your brine ingredients in a separate pot and turn the heat to medium. Once the ingredients have all dissolved, you can turn the heat up to high.
- You will need the brine to be boiling before you introduce it into the jars with the cucumbers. Don’t worry, the timing of this gets easier the more you do it. By the end of a season you will be a pro!
- You also need to bring a large pot of water to a boil. This is where you will process the jars once filled.
- In our experience, it was easiest to use the same pot you sterilized the jars in. You know it’s enough water, and the water is already hot!
- While your brine is heating up, you need to take your (now sterile) mason jars and pack them with cucumbers and other ingredients.
- Start by dropping in the peppercorns, garlic cloves, and bay leave.
- If you want a pretty presentation, pinch the dill heads against the side of the jar right before you start packing the cucumbers in. It traps them there, and when you are finished, you have beautiful dill flowers visible!
- Now pack in the cucumbers. It doesn’t matter if you used whole or sliced cucumbers, but you do need to pack them in pretty tight. It’s surprising how many cucumbers you can fit in a jar!
- Maintain about a 1/2 of headspace (room between the cucumbers and the opening of the jar).
- Now that the jars are packed, you need to add the boiling brine. Fill each jar until the brine is about a 1/2 inch from the opening. Screw a lid into place, but not too tight. You want them loose enough that any air bubbles can escape during the next step.
- While the jars are still hot, get them into the boiling water as soon as possible.
- Remember, you need the jars to be submerged at least an inch.
- It is helpful to keep the glass jars off the bottom of the hot pot. A submerged dish towel can work, or there are rubber mats sold that accomplish the same thing.
- The water may stop boiling once you add the jars to it. Timing starts from the moment the water is boiling with the jars already in the water.
- In order to kill any bacteria, you need to process the jars for 15 minutes in the boiling water.
- Over processing leads to soggy pickles, but MAKE SURE you process for 15 minutes or the pickles may not be safe!
- After the 15 minutes is up, remove the jars from the boiling water and set them somewhere at room temperature for 24 hours. This gives the liquid in the jars time to cool down slowly… speeding up the process (by putting the in the fridge for example) could cause the glass to shatter.
- Don’t be surprised if you hear popping noises while the jars are cooling! That is actually a good sign… the lids typically make a surprising “pop” when they finally seal!
- After 24 hours, you can test the seal of the lids by pushing down slightly. If they sealed correctly, there won’t be any flex.
- Sealed jars can now be stored at room temperature for 12 – 18 months. You can remove the ring if you choose to, since at this point it isn’t holding the lid in place anymore (but it does look nice!)
- NEVER eat a jar of pickles if you they seem suspicious. If for any reason you believe the seal was disrupted, or the pickles smell or taste funny… discard them! Do not take chances with preserved food.
- Don’t worry if a jar or two did NOT seal after 24 hours. They are still going to be great pickles! Just put them in the fridge and eat within three weeks!